Caution
You are not reading the latest stable version of this documentation. If you want up-to-date information, please have a look at 0.3.5.x.
Mozilla provides some of the most flexible, secure, and freedom-principled applications for using the web. We highly recommend completing all configuration below.
This guide applies to Firefox, Firefox ESR, Librewolf, and Thunderbird. Mozilla apps need to be configured to use the certificate store of your device. To find out why Mozilla does this differently, you can read their blog post on the topic (TLDR: for security purposes).
Open Firefox and enter about:config in the URL bar. Accept any warnings that may appear about changing advanced configuration preferences.
Search for security.enterprise_roots.enabled and double click on false so that it turns to true:
For each Mozilla-based application (Firefox, Firefox ESR, LibreWolf, Thunderbird, etc) you plan on using, you will need to complete the following guide. This is in order for them to trust your Start9 server’s CA certificate directly from your Linux distribution’s certificate trust store.
Select the hamgurger menu, then Settings, then search for “security devices”, then select “Security Devices…”
When the Device Manager dialog window opens, select “Load”
Give the Module Name a title such as “System CA Trust Module” and for the Module filename, paste in /usr/lib/x86_64-linux-gnu/pkcs11/p11-kit-trust.so and hit OK:
Verify that the new module shows up on the left hand side and select OK at the bottom right:
Now restart Firefox (or other Mozilla application), and log in to your server using https. You should now see this symbol indicating a secure connection:
Tip
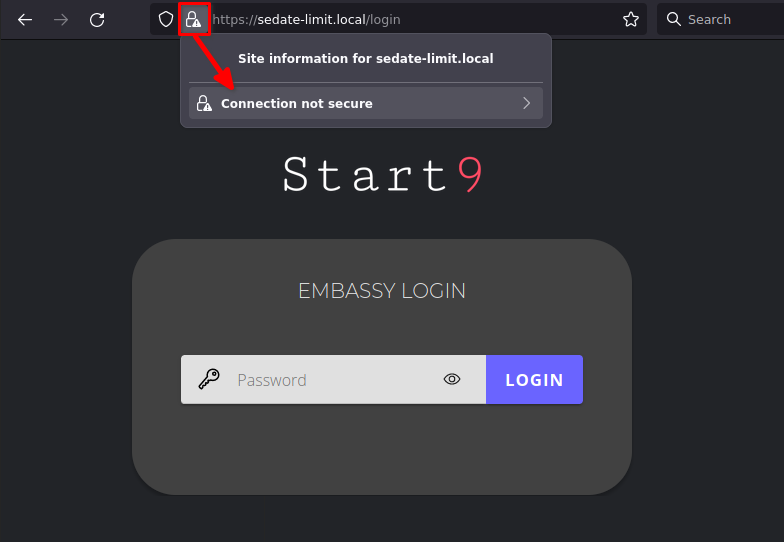
If you see an exclamation point inside a triangle by the lock, you have made a security exception in the browser. You will need to remove it by clicking the lock and then “Connection not secure”:

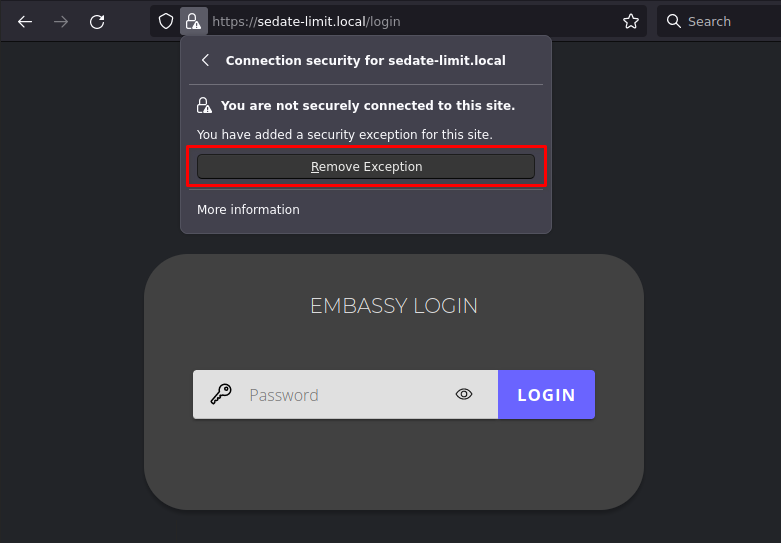
Then click “Remove Exception”:

You should now see that the website is trusted as in the final step show above.
Caution
This guide assumes you have completed setting up Tor. Please visit this section first before you proceed as it is required for Firefox to properly work with Tor.
Open Firefox and enter about:config in the URL bar. Accept any warnings that may appear about accessing advanced settings.
Search for dom.securecontext.allowlist_onions and set the value to true:
Next, search for network.websocket.allowInsecureFromHTTPS and set the value to true:
Download a Proxy Auto Config file to inform Firefox how to use the Tor daemon running on your computer. You can get Start9’s standard file from a terminal, by using:
sudo wget -P /etc/tor https://start9.com/assets/proxy.pac
Now, back in your Firefox web browser, select Settings from the right-hand hamburger menu:
Search for the term “proxy” in the search bar in the upper right, then select the button that says Settings…:
This should open a menu that will allow you to configure your proxy settings. Select Automatic proxy configuration URL and paste in the path to your PAC file from earlier, prefixed with file://. For example:
file:///etc/tor/proxy.pac
Then, check the box labeled Proxy DNS when using SOCKS v5:
Click OK and then restart Firefox for the changes to take effect.
You’re all set! You should now be able to navigate to .onion URLs in Firefox. This means you can access tor service WebUIs, and use client integrations such as Vaultwarden apps and extensions. You can test this by going to Start9’s .onion homepage, here.
If you still encounter issues, contact support.